Parent Reporting
Parent Reporting – Functionality and Options
Parent Reporting in OneStudent is a streamlined feature designed to help schools easily create, manage, and distribute student reports to parents. The functionality provides a centralised, efficient way to deliver meaningful student information while reducing administrative workload.
Core Purpose
Parent Reporting enables schools to:
- Generate consistent, professional reports for parents
- Distribute them electronically through OneStudent
- Customise content and layout to meet the school’s specific reporting requirements
What the Report Can Include
Parent Reports can be tailored by each school and may include:
- Academic Results
- Effort and Behaviour
- Student Absences (Optional)
Additional school-specific information can also be included depending on the school’s reporting needs.
Key Functionality
- Easy Configuration: Define report templates, layouts, and the data to include
- Automated Data Import: Pulls information directly from OneStudent, ensuring accuracy
- Flexible Reporting Cycles: Create term, or semester.
- Secure Distribution: Reports can be shared digitally with parents via the OneStudent portal.
- Full Audit Trail: Track when reports are generated and sent.
Outcome
With OneStudent’s Parent Reporting module, schools can deliver clear, customised, and timely insights into student progress—helping to strengthen communication between the school and home.
NOTE: The Parent Reporting email template can be customised to meet the specific needs of the school.
Parent Reporting – High-Level Overview
1. Data Entry
Allows users to select a class and update Effort and Behaviour ratings for each student. This section is designed for quick manual updates when only these specific fields need to be entered or adjusted.
2. Configuration
Used to set the Year Level Achievement Result options for each reporting period (terms or semesters). Schools can choose the type of achievement outcome to display in the Parent Report, including:
- Overall Grade
- Overall Score
- Overall Percentage
- Final Result
- Final Grade
This ensures consistency in how results are presented across all reports.
3. Import Data
Enables bulk data upload into OneStudent from external systems (e.g., OneSchool). Administrators can import parent details and student absences data using structured CSV files. This option streamlines data population and ensures accuracy by reducing manual entry.
4. Send Report
This section allows administrators to generate and send Parent Reports. Key features include:
- Displays Status of report generation
- Shows the number of reports generated
- Tracks emails sent and email errors
- Organises reporting by Reporting Periods and then by Year Levels
This ensures administrators can monitor report distribution and identify any issues promptly.
5. Email History
Provides a complete log of all Parent Report emails sent through OneStudent. Key features include:
- Logs are divided by Year, Term, Semester, and Year Level
- Administrators can view all results, just sent reports, or errors only
- Reports can be viewed and downloaded if required
This ensures transparency, easy tracking of report distribution, and the ability to follow up on any issues.
Parent Reporting – Data Entry
The Data Entry section in OneStudent allows users to manually update specific student information for Parent Reports. This feature is designed for efficiently entering Effort and Behaviour ratings.
Key Features
- Class Selection: Users can select the relevant class from a dropdown list to view all students enrolled in that class.
- Effort Ratings: Update each student’s effort level for the selected reporting period.
- Behaviour Ratings: Update each student’s behaviour rating to provide feedback on conduct and classroom participation.
User Access
- Administrators: Can update all classes across the school.
- Teachers: Can update only their own classes.
- Heads of Department (HODs): Can update any class within their department.
NOTE:Data Entry is the only functionality available to all user types within the Parent Reporting module. All other functions (Configuration, Import Data, Send Report, Email History) must be completed by an administrator.
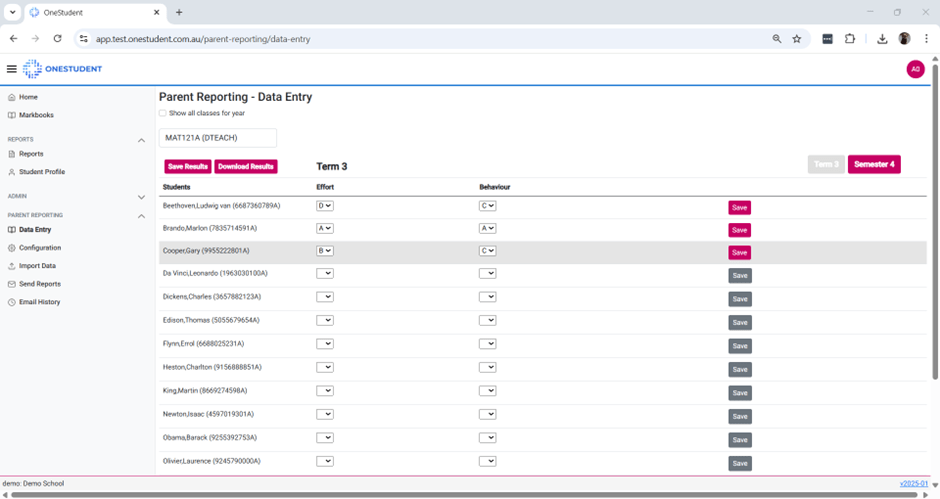
Examples of Data Entry page with class MAT121A selected:
NOTE: Some data has been added here for demonstration purposes. The Save icon at the end of the column is purple, indicating that the data for that student has not yet been saved. You can either click the individual Save icon for each student or use the Save Results button at the top left of the page to save all entries at once.
All saved results will be recorded for the selected reporting period. In this example, the results are being entered for Term 3.
Parent Reporting – Data Entry: Look & Feel
- From the Data Entry page,
- Select the relevant Class from the Select Class dropdown list.
- The selected class is displayed, showing all students associated with that class.
Understanding the Data Entry Page
The following elements are available on the Data Entry page:
- Show All Classes for the Year: Select this option to display all classes for the selected year. This is useful as not all classes run for the full year.
- Class Code: Displays the class selected from the Select Class dropdown list.
- Save Results: Allows you to save all changes made to student results on the Data Entry page at once.
- Download Results: Downloads a CSV file containing the current results for the selected class.
- Terms and/or Semesters Navigation: Allows users to move between different terms or semesters to complete data entry for each reporting period.
- Data Entry Area: The remainder of the page is used for data entry. This is where Effort and Behaviour results are recorded for each student. The Save option becomes available once results have been entered.
Tips for Efficient Use
- Verify the class selected is correct before entering data.
- Double-check ratings for accuracy to ensure reports reflect the correct student performance.
Parent Reporting – Configuration
The Configuration section in OneStudent allows administrators to define how student achievement results are presented in Parent Reports. This ensures that reporting is consistent, accurate, and aligned with the school’s assessment standards.
Purpose
The Configuration feature is used to set the Year Level Achievement Result for each reporting period (terms or semesters). By selecting the appropriate options, schools control how student performance is displayed to parents.
Achievement Result Options
Schools can choose from the following options to include in Parent Reports:
- Overall Grade: Displays the student’s final grade for the term or semester.
- Overall Score: Displays the total score achieved by the student.
- Overall Percentage: Shows the student’s percentage for the reporting period.
- Final Result: Indicates the student’s overall result based on the school’s grading system.
- Final Grade: Displays the final grade awarded for the term or semester.
Selecting the appropriate outcome ensures that reports are clear, consistent, and meet the school’s reporting standards.
User Access
- Only Administrators can configure Year Level Achievement Results.
- Teachers and Heads of Department do not have access to this functionality.
Workflow
- Navigate to the Parent Reporting – Configuration page.
- Select the Year Level to configure.
- The configuration window displays Term 1, Semester 1, Term 3, and Semester 2.
- For each term or semester, select the required Achievement Result Outcome (Overall Grade, Overall Score, Overall Percentage, Final Result, or Final Grade).
- Save changes to ensure they are applied to all Parent Reports for the selected year level and reporting periods.
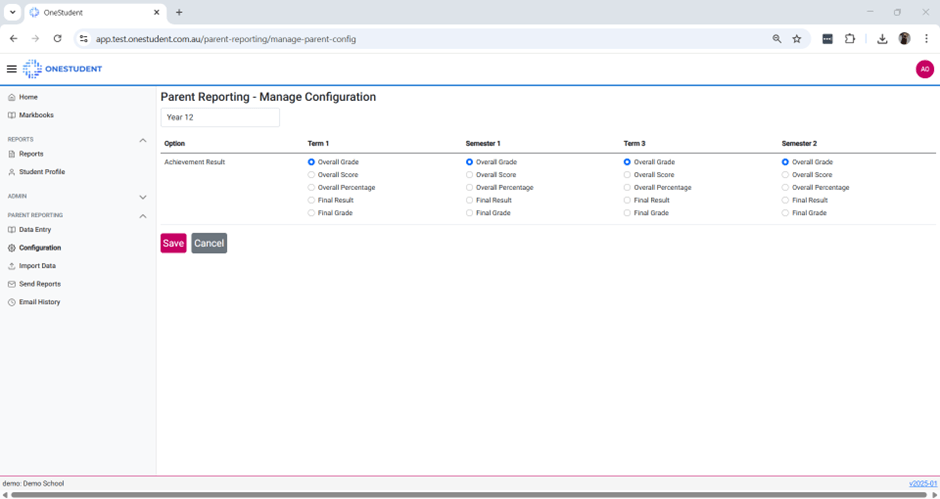
Examples of OneStudent Parent Reporting – Manage Configuration page filtered by Year 12:
Tips for Efficient Use
- Verify the Year Level and Reporting Period before saving changes.
- Use consistent result types across all year levels for clarity in reporting.
- Review the selected configuration before generating Parent Reports to ensure accuracy.
- Parent Reporting – Import Data – Functionality and Options
The Parent Reporting – Import Data page allows Administrators to upload and manage data from external systems (e.g., OneSchool) into OneStudent, such as parent contact information.
Import Data Types
- Parents (Required)
- Student Absences (Optional)
Available Actions for Each Import Type
- Download Template: Provides a blank template formatted to match the required OneStudent structure.
- Download CSV: Downloads the current data stored in OneStudent for the selected import type, allowing administrators to review or update existing records.
- Import: Allows administrators to upload a CSV file by pasting the data into the text box on the Import Data page.
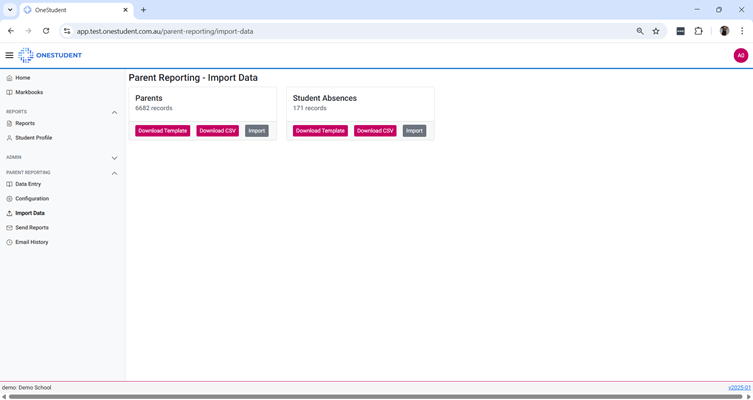
Examples of OneStudent Parent Reporting – Import Data page:
Understanding the data collected by the Import Data
The following data is collected, for each of the Import Data types:
- Parents (Required)
- EQID,
- FirstName,
- Email.
- Student Absences (Optional)
- EQID,
- Reporting Period,
- Total Days Absent,
- Total Unexplained Absences,
- Total Late Arrivals To Class.
Download Template
The Download Template button can be used to establish data in the correct structure required for OneStudent.
To Download Template for a data type:
- From the Import Data page
- Navigate to the relevant Import data type
- Select the Download Template button
- The relevant Import data type template will be download
- Populate data as required.
- Once completed use the Import button to upload data into OneStudent
Download Template
The Download Template button provides a blank file in the correct structure required for uploading data into OneStudent.
To download a template:
- Go to the Import Data page.
- Select the relevant Import Data type.
- Click Download Template.
- The template for that data type will be downloaded.
- Populate the template with the required data.
- When complete, upload the data into OneStudent using the Import button.
Import
The Import button is used to upload CSV data for the selected data type, such as information exported from other systems (e.g., OneSchool).
To import data:
- Go to the Import Data page.
- Select the relevant Import Data type.
- Click the Import button.
- The Paste CSV data in the textbox below section will appear beneath the selected data type.
- Open the source file containing the data you want to import.
- Copy the required data (either all records or only the updated ones).
- Paste the data into the Paste CSV data textbox.
- Select or deselect Remove existing data, depending on whether you want to overwrite previous records.
- Click the Import button at the bottom of the page.
- A confirmation message will appear once the import is successful.
- The record count for the selected data type will update accordingly.
Import General Comments
- Ensure all data is complete and accurate before importing, as missing or incorrect entries may cause errors.
- Use consistent naming and make sure your data matches the required format.
- The header row must always be included in all imports.
- Header column names must match the template exactly.
- Avoid opening CSV files in Excel, as it can automatically reformat data (e.g., changing a score like “5/10” into a date such as “5/10/2022”).
- Instead, use Notepad++, which is free and recommended by QCAA. We also provide a tutorial on how to download Notepad++ Click Here.
Parent Reporting – Send Report
The Send Report section in OneStudent allows administrators to generate and distribute Parent Reports to parents. This area provides clear visibility of report status, email delivery, and any issues that require follow-up.
Purpose
The Send Report function is used to:
- Generate Parent Reports for students
- Send reports to parents via email
- Monitor the status of report generation and email delivery
This ensures reports are sent accurately and any issues can be identified and resolved quickly.
Key Features
- Status Tracking: Displays the current status of report generation (e.g. pending, completed, errors).
- Reports Generated: Shows the total number of reports created for the selected reporting period and year level.
- Email Tracking: Displays the number of emails successfully sent and highlights any email errors.
- Structured Organisation: Reports are organised by Reporting Periods (Term or Semester) and then by Year Levels, making it easy to locate and manage report batches.
User Access
- Only Administrators have access to the Send Report function.
- Teachers and Heads of Department do not have access to generate or send Parent Reports.
Workflow
- Navigate to the Parent Reporting – Send Report page.
- Select the required Reporting Period (Term or Semester).
- Choose the relevant Year Level.
- Review the summary information, including report status and counts.
- Generate the reports for the selected period and year level.
- Send the reports to parents.
- Review the status, number of emails sent, and any email errors.
Tips for Efficient Use
- Always review the Status and Email Errors after sending reports.
- Resolve missing parent email details before resending reports.
- Confirm reports are generated for the correct reporting period and year level before sending.
Parent Reporting – Email History
The Email History section in OneStudent provides administrators with a complete log of all Parent Report emails sent through the system. This feature allows schools to monitor report distribution, identify any delivery issues, and ensure transparency in communication with parents.
Key Features
- Structured Logs: Email logs are organised by Year, Term, Semester, and Year Level, allowing administrators to quickly locate records for specific reporting periods.
- Filter Options: Administrators can filter the log to view:
- All Results – Shows every report sent in the selected period.
- Sent Reports Only – Displays reports that were successfully delivered.
- Errors Only – Highlights any reports that failed to send, allowing follow-up action.
- Report Access: Administrators can view individual reports directly from the log and download reports if needed for record-keeping or audits.
This functionality ensures schools have full visibility over report distribution and can quickly resolve any delivery issues.
Workflow
- Navigate to the Parent Reporting – Email History page.
- Select the Year, Term, Semester, and Year Level to filter the log.
- Use the filter options to view either all results, sent reports only, or errors only.
- Click on a report entry to view the report in detail.
- Use the download option to save copies of reports for documentation or auditing purposes.
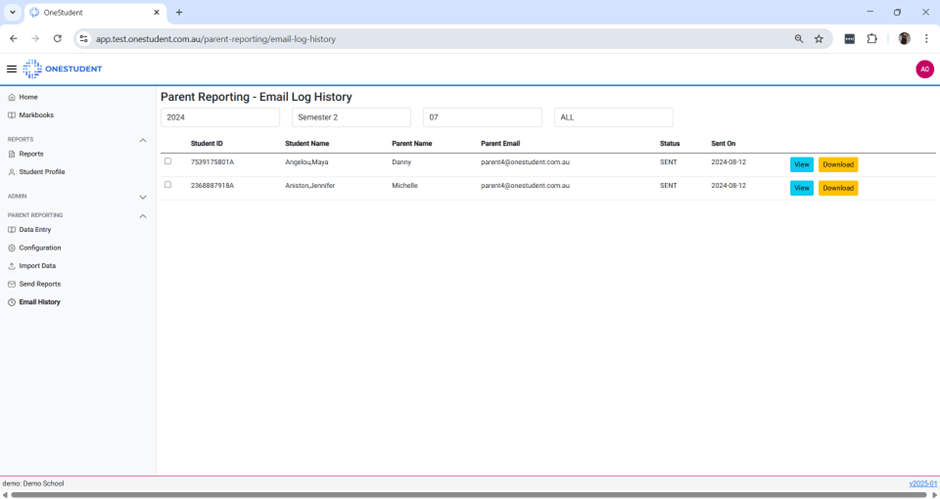
Example of OneStudent Parent Reporting – Email History page filtered by Year – 2024, Term or Semester – Semester 2, Year Level – 07, View – All:
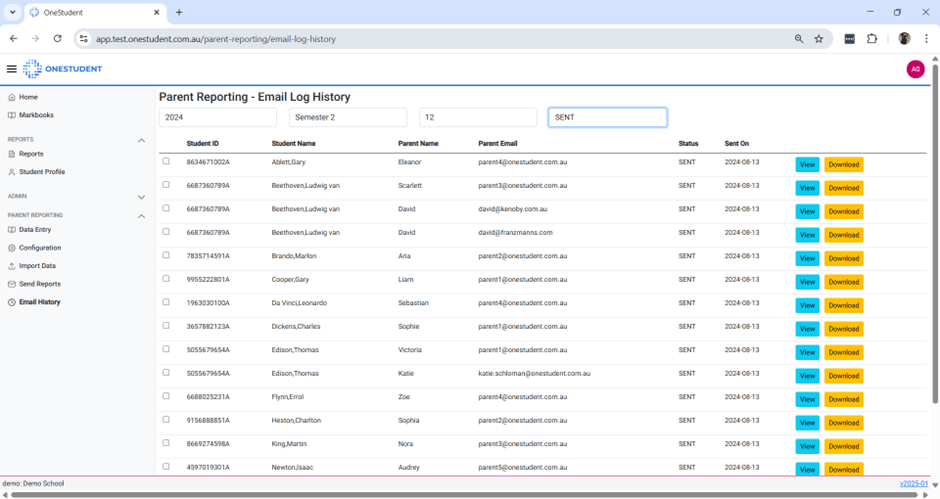
Example of OneStudent Parent reporting – Email History page filtered by Year – 2024, Term or Semester – Semester 2, Year Level -12, View – SENT:
Example of OneStudent Parent Reporting – Email History page filtered by Year – 2024, Term or Semester – Term 1, Year Level -12, View – ALL:
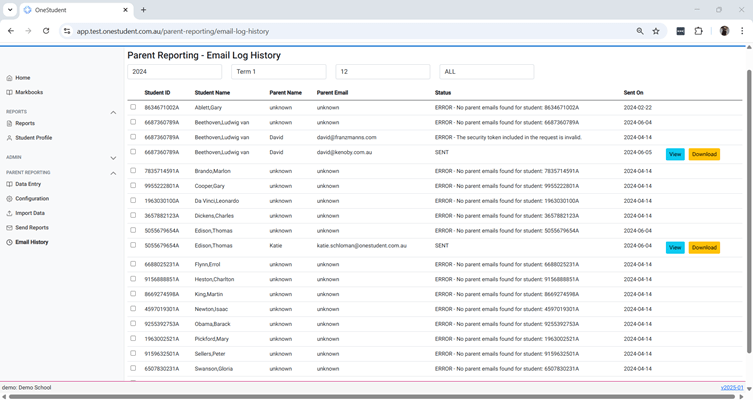
NOTE: You can see in this view that some entries show errors, as not all students have a report available to view or download. The Status column provides details about each issue (e.g., No parent email found for student), and the Parent Name and/or Parent Email fields may display Unknown.
To resolve this, you will need to update the Import Data – Parents section with the correct parent contact information for each of the students that have errors.
Example of OneStudent Parent Reporting – Email History page filtered by Year – 2024, Term or Semester – Term 1, Year Level – 12, View – ERROR:
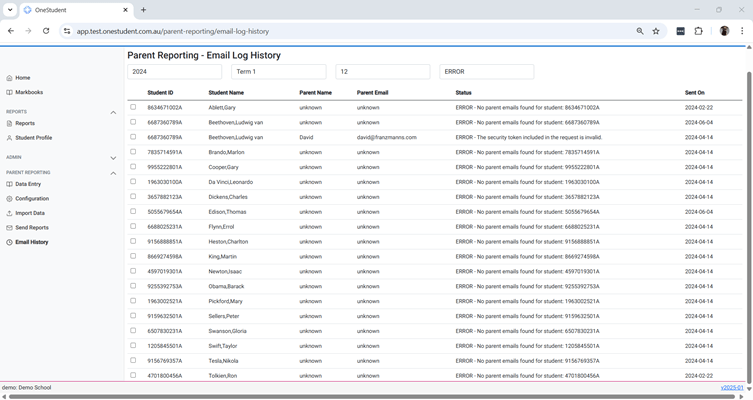
NOTE: This is the same as the previous example; however, the view has been filtered to ERROR, so only the records with errors are displayed. To resolve these issues, follow the steps outlined above for correcting parent contact information in the Import Data – Parents section.
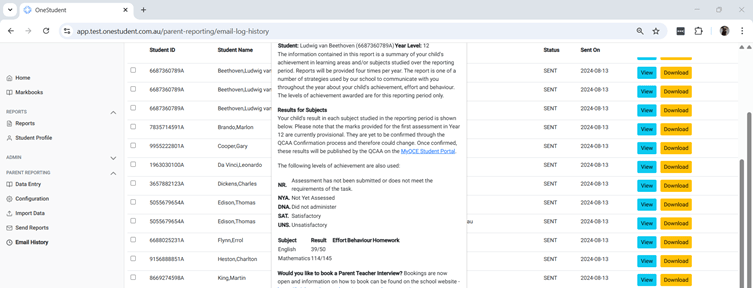
Example of OneStudent Parent Reporting – Email History page filtered by Year – 2024, Term or Semester – Term 1, Year Level – 12, View – SENT:
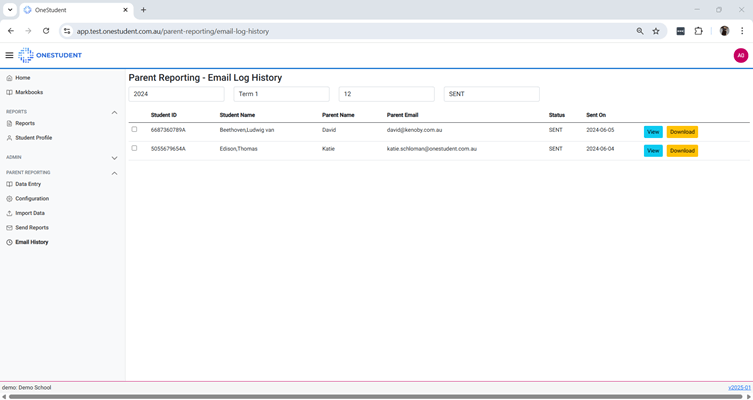
NOTE: This is the same as the example above but filtered to show only Sent Reports. You can use View to open the report on screen, or Download to save a copy to your computer’s Downloads folder.
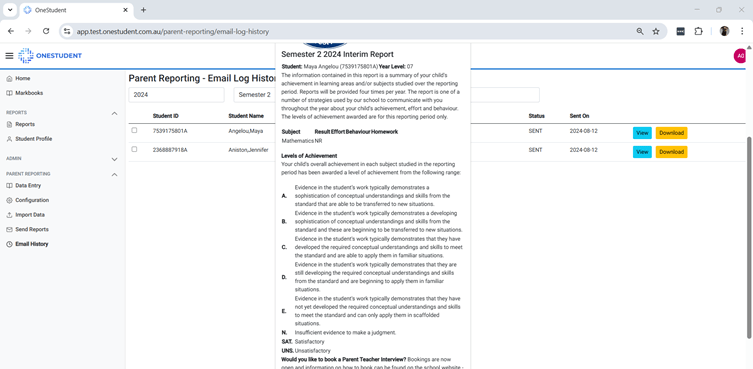
Example of OneStudent Parent Reporting – Email History page use View to open the report on screen for Year Level 07:
Example of OneStudent Parent Reporting – Email History page use View to open the report on screen for Year Level 12:
NOTE: The Download option will save the report as a PDF. These reports can be fully customised to include your school’s specific requirements. The example shown here is for demonstration purposes only. Please speak with the OneStudent team to have your customised report set up, including elements such as your school logo and any other required information.
If you compare the Year Level 07 and Year Level 12 report examples, you will notice they are different. This reflects the reality that a one-size-fits-all report does not work in schools. Different year levels often require different reporting formats, and this can be built into your OneStudent solution.
Tips for Efficient Use
Use the filtering tools to quickly locate specific reports by year, term, semester, or year level.
Always check Errors Only after sending reports to ensure all parents received their emails.
Regularly download reports for compliance or archival purposes.
