Import Data
Import Data – Functionality and Options
The Import Data page allows the Administrator to manage data to be uploaded into OneStudent from another system (i.e. OneSchool), such as students, staff, timetable and classes.
The Import Data can only be configured once Configuration is completed.
Important: When entering data from other systems into OneStudent, please ensure that the data matches exactly if it is the same—for example, subject data. All data must be entered consistently across all import files to ensure that OneStudent recognises them as the same. For further Tips and Trick.
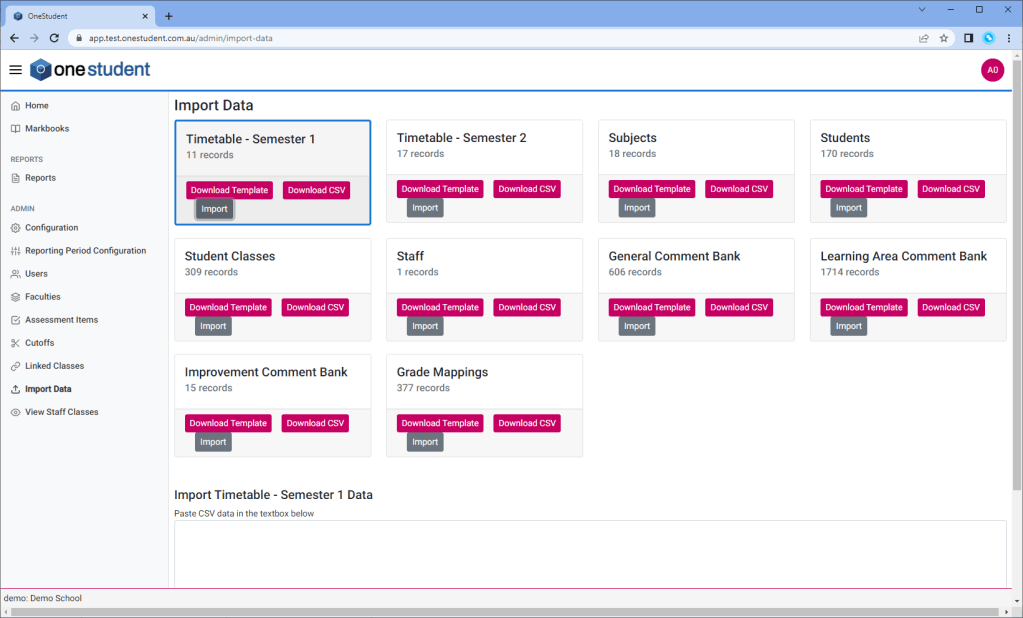
Example of OneStudent – Import Data page:
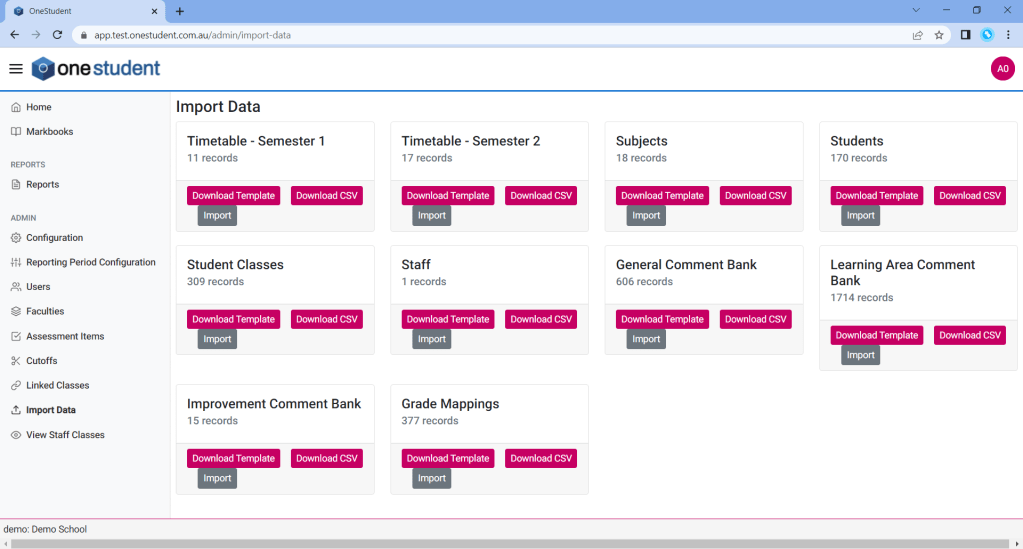
The Import Data types are:
- Timetable – Semester 1
- Timetable – Semester 2
- Subject
- Student
- Student Classes
- Staff
- General Comment Bank
- Leaning area Comment Bank
- Grade Mapping
The options available for each Import Data options are:
- Download Template,
- which can be used to establish data in the structure required for OneStudent.
- Download CSV,
- which will download the current associated data for the selected option within OneStudent, which can be used to manage the data.
- Import,
- which can be used to import CSV data for the selected option using the text box on the Import Data page. Notepad++ must be used to ensure the data is in the correct format for Import.
Import Data – Understanding data collected
The following data is collected, for each of the Import Data types:
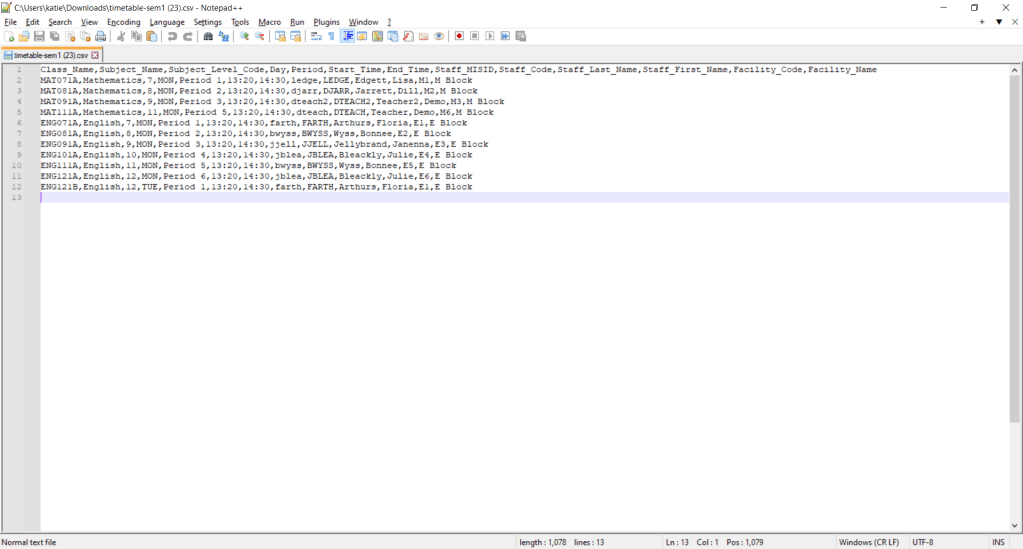
Timetable – Semester 1
- Class Name,
- Subject Name,
- Subject Level Code,
- Day,
- Date,
- Period,
- Start Time,
- End Time,
- Staff Id,
- Staff MISID,
- Staff Code,
- Staff Last Name,
- Staff First Name,
- Facility Code,
- Facility Name.
Timetable data is required for the Markbooks.
Timetable – Semester 2
- Same as Timetable 1.
Timetable data is required for the Markbooks.
Subject
- Subject Code,
- Subject Name,
- Faculty.
Subject data is required for the Markbooks, can be managed via Import Data page and/or Faculties page.
Students
- Student Name,
- EQID,
- LUI,
- Date of Birth,
- Sex,
- Roll Class,
- Year.
Students data is required for the Markbooks.
Student Classes
- EQID,
- Class Name.
Student Classes data is required for the Markbooks.
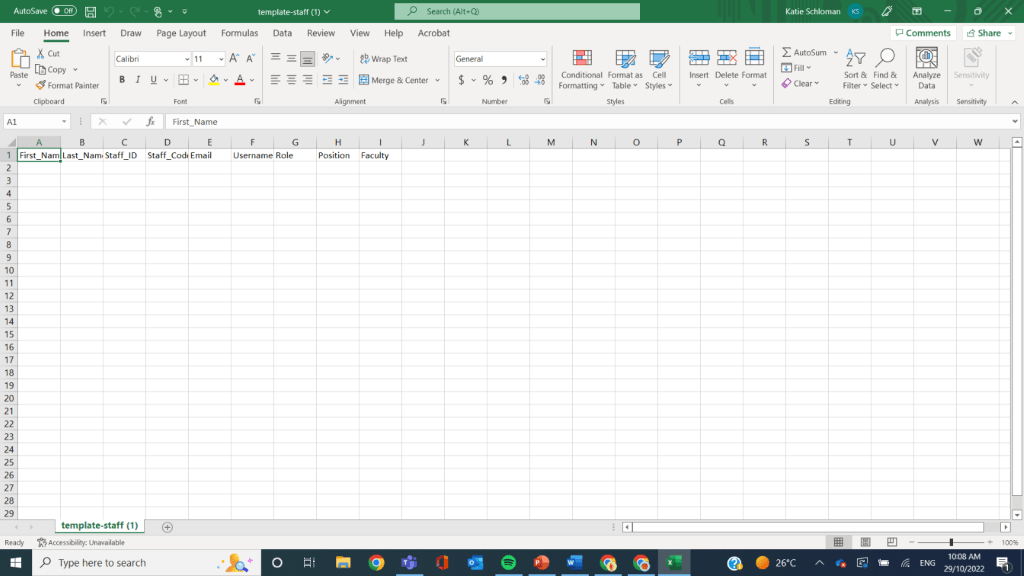
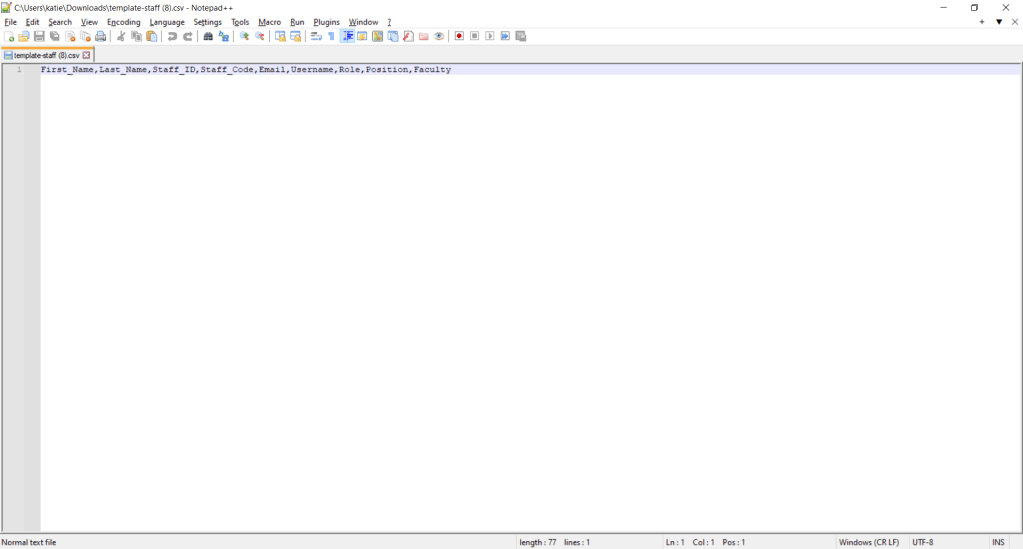
Staff
- First Name,
- Last Name,
- Staff ID,
- StaffCode,
- Email,
- Username,
- Role,
- Position,
- Faculty.
Staff data is required for the Markbooks, can be managed via Import Data page and/or User page.
General Comment Bank
- Comment Type,
- Criteria Type,
- Criteria Value,
- Comment Code.
General Comments data is required for the Markbooks
Learning Area Comment Bank
- Learning Area Code,
- Learning Area Faculty,
- Subject,
- Year Level,
- Criteria,
- Comment Description,
- Comment Code.
Learning Area Comments data is required for the Markbooks.
Grade Mapping
- Scale,
- Mark,
- Grade.
Grade Mapping data is required for the Markbooks.
Import Data – Tips and Tricks
The following outlines some tips and tricks related to Import data.
- Ensure that there is no blank data fields, in data to be imported, e.g. Facility_Code.
- Ensure that the data gathered for other sources e.g. One School, in correctly populated into the OneStudent Import templates under the correct headings.
- Timetable Imports – Ensure that only Subject are imported. Remove any classes from the timetable that will not be using Markbooks. E.g. Roll Class and Year Parade. These will be found within the timetable data gathered from other systems, however the data doesn’t match the criteria for OneStudent and therefore will create an issue where not all subjects will be visible in Markbooks or Assessment Items.
- Notepad++ must be used before Importing data as it ensure the CSV is in the correct format for importing.
Import Data – Download Template
The Download Template button can be used to establish data in the correct structure required for OneStudent.
To Download Template for a data type:
- From the Import Data page.

- Navigate to the relevant Import data type.
- Select the Download Template button.
- The relevant Import data type template will be download.
Example of OneStudent – Import Data – Download Template in Excel (Note: OneStudent recommends using CSV files for data imports and updates.):
Example of OneStudent – Import Data – Download Template in Notepad++:
- Populate data as required.
- Save the source data file.
- Once completed following the Import Data – Import instructions to upload data into OneStudent.
Import Data – Download CSV
The Download CSV button can be used to download the current associated data for the selected option within OneStudent. This can be used to manage that data, for example bulk updates.
To Download CSV for a data type:
- From the Import Data page.
- Navigate to the relevant Import data type.
- Select the Download CSV button.
- The relevant Import data type CSV file with be downloaded, with all the current data within OneStudent. Example of OneStudent – Import Data – Download CSV in Notepad++:
- Manage data as required.
- Save the sources data file.
- Once completed following the Import Data – Import instructions to upload data into OneStudent.
Import Data – Import
The Import button can be used to import CSV data for the selected option, for example data gathered from other systems like OneSchool.
To Import for a data type:
- Navigate to the Saved source data file to be imported.
- Right click and Open the file Notepad++
(NOTE: This will ensure the data is in a format that will avoid errors when importing)
- Copy the relevant data to be Imported, (either all or just updated).
- Navigate to OneStudent, Import Data.
- From the Import Data page.
- Navigate to the relevant Import data type.
- Select the Import button for that data type.
- The Import Data – Paste CSV data in the textbox below box will be displayed below the Import Data type.
- Paste the Copied relevant data into the Paste CSV data in the textbox box.
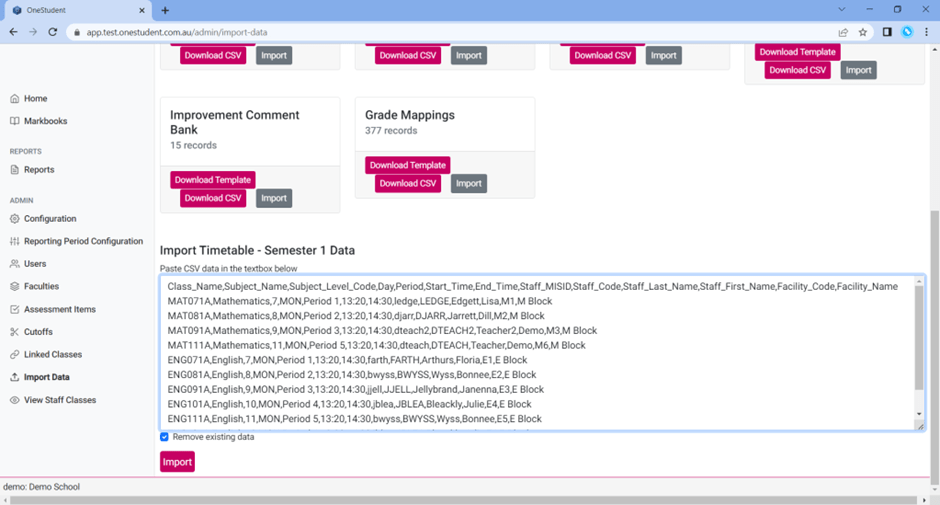
- Select or deselect Remove existing data.
- Select the Import button at the bottom of the Import Data page.
- A message will be displayed to indicate that the data has been successful imported.
- The number of records will change on the relevant data type.
The table below outlines the information required to assist in populating the Import Data fields in OneStudent using data extracted from OneSchool reports.
| OneStudent Report | OneSchool Report |
| Timetable | Timetable Export IMPORT NOTE: Only a subset of the Timetable data from OneSchool is required. At a minimum, there should be one unique row per subject. An additional row is only necessary if there is a variation, such as an additional teacher assigned to that subject. It is recommended that any non-reportable classes — for example, Roll Classes — are removed prior to importing the data. |
| Student classes | Student Class Export IMPORT NOTE: For the Student Classes import, it is recommended that only reportable classes are included. Any non-reportable class references should be removed prior to upload. |
| Staff | The process isn’t always straightforward, as OneSchool does not provide a clean, standalone staff report suitable for import. Extract the available staff details from the Timetable Export and then manually add any Deputy Principals, Heads of Year, or administrative staff who do not have teaching allocations (and therefore do not appear in the timetable export). IMPORT NOTE: Both Role and Position fields are required for the OneStudent Staff import. In many cases, these fields may contain the same value. For example, teaching staff will typically have Teacher entered for both Role and Position. However, for non-teaching staff (e.g. Deputy Principal, Head of Year, Administrator), the Position may be more specific while the Role reflects their system access level. Ensuring both fields are completed correctly helps maintain accurate permissions and reporting within OneStudent. The following is the list of approved Roles within OneStudent. These must be entered exactly as shown below: – Admin – Deputy Principal – Head of Department – Head of Year – Non-teaching Staff – Teacher – Teacher Aid Please ensure the full role name is used. Abbreviations or acronyms (for example, HOD) will not be recognised by the system and may result in import errors or incorrect access permissions. |
| Students | Dynamic Student report |
| Subjects | Taken from Timetable Export IMPORT NOTE: Each subject must have a unique Subject_Code. You cannot have two subjects with the same code. Subject_Codes should: – Contain letters only – Not include symbols, spaces, or special characters – Be consistent with the Class_Name prefix in the Timetable file If you need to update a Subject_Code to make it unique, you must also update: – The Timetable CSV – The Student Classes CSV This ensures all references remain aligned across the system. Here is an example of some Subjects: Subject_Code, Subject_Name, Faculty AEN,Aspire English,Junior English AHS,Ancient History,Senior Humanities AHU,Aspire Humanities,Junior Humanities AMA,Aspire Mathematics,Junior Maths AMP,Accelerated Music Program,The Arts |
